|
|
|
|
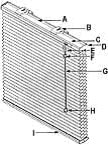
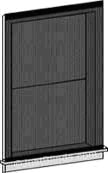
| Cellular And Pleated Shades |
|
| How to Install Cellular and Pleated Shades |
|
| Congratulations on your purchase of cellular or pleated
shades. Your shade has been custom made to your specifications and is one of
the finest window treatments available. Before you un wrap your shades, please
take a few moments to read these instructions. When using tools, make sure you
have proper eye protection. With careful installation and periodic cleaning,
your blinds will provide you with many years of trouble free service. Unpack
your new shade and check the packaging carefully to assure all parts have been
removed before discarding the shipping containers. |
|
| Tools Needed |
-
Tape Measure (metal or wood)
-
Pencil
-
Screwdrivers (flat & Phillip)
-
1/4'' Hex nut driver
-
Drill
-
Level (optional)
-
1/16'' or 3/32'' drill bit
|
|
| All parts listed are not included with every shade |
-
Head rail
-
Installation Bracket
-
Cord Lock
-
End Cap
-
Stop Ball
-
Cord Joiner
-
Pull Cord
-
Tassel
-
Bottom Rail
|
|
| Fastening the brackets into various materials: |
| Sheetrock, Drywall or plaster |
| Plastic anchors or toggle bolts are required when studs cannot be used. |
|
 |
| Concrete, Stone, Brick or Tile |
| Use a carbide drill bit and appropriate expansion anchors. |
| Steel |
| Purchase #8 self-tapping screws. Drill pilot holes as necessary. |
|
 |
|
 |
|
|
| Step 1. Determining Mounting Method |
|
| Your shade has been custom manufactured to your specifications as either an
Inside Mount (inside the window recess) or Outside Mount (on window frame or
wall) |
|
-
Inside Mount A minimum of 3/4" window recess is required
-
Outside Mount if mounting above trim or other obstructions (crank handles,
etc.) Spacers’ blocks may be required.
|
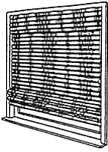
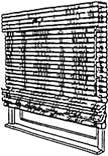
Inside Mount
 |
Outside Mount
 |
|
|
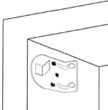
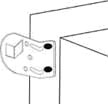
| Step 2. Attach Bracksts to Mounting Surface |
|
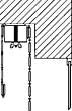
| Inside Mount |
| Mount the brackets to the top of the window frame and 2 1/2" in from the edge
of the window frame. Make sure the brackets are aligned with one another. |
|
 |
|
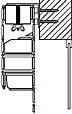
| Outside Mount |
| Center the shade over the window opening at the desired height. Mark the
position of the ends of the head rail on the wall. Attach the mounting brackets
to the wall 2 1/2" in from the marks making sure the mounting brackets are
level with one another. |
|
 |
|
|
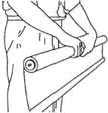
| Step 3. Inserting the Head Rail |
|
| Inside Mount |
| Firmly push the back of the head rail into the tab of each bracket. Push up on
the bottom rear portion of the head rail to engage the hook at the bracket
front. |
|
 |
|
| Outside Mount |
| Engage the hook on the bracket front with the ridge on the top surface of the
head rail. Push up on the bottom rear portion of the head rail until the head
rail snaps into place. |
|
 |
|
|
| Step 4. Attaching the Optional Hold Down Brackets |
|
| Hold down brackets are used on the ends of the bottom rail to keep the blind
from swaying. They are used on applications such as doors or on frequently
opened windows to prevent the wind from blowing the shade around. They are
available at no extra charge but must be requested at the time of order
placement. |
|
 |
|
|
| CAUTION: Check to be sure that the
bracket and head rail are properly secured before operating the shade.
|
|
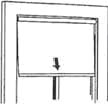
| Step 5. Operating Your Shade |
|
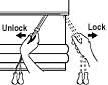
| To lower the shade, pull the cord down and toward the center of the shade to
unlock the cord. While holding the cord toward the center, lower the shade to
the desired position. Move the cord back past the outside edge of the shade and
release to lock the shade into position. |
|
 |
|
|
| Step 6. Child Safety |
|
-
Clamp or Clothes Pins
-
Cleat
-
Tie the cord to itself
-
Tie-down device
|
 |

Young children can become entangled and strangle in cords. Keep all cords out
of the reach of children. To avoid strangulation, use these devices. |
 |
|
|
| Step 7. Cleaning and Care |
|
| All you need to keep these shades looking new is a brush-type vacuum attachment or feather-duster for dusting; just stroke lightly over the shade. To clean with water, use a lukewarm damp sponge and wipe with firm, light strokes. |
|
| Note: With time, pleats may settle. Pleats at the bottom will be fuller than those at the top. Shades that are raised regularly will be less subject to pleat settling and will maintain a more crisp appearance. |
|
|
|
|
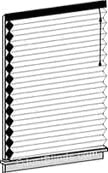
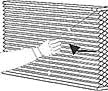
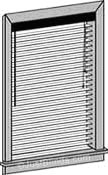
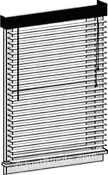
| Horizontal Blinds |
|
| How to Install Horizontal Blinds |
|
| Congratulations on your purchase of a horizontal blind.
Your blind has been custom made to your specifications and is one of the finest
window treatments available. Before you un wrap your blinds, please take a few
moments to read these instructions. When using tools, make sure you have proper
eye protection. With careful installation and periodic cleaning, your blinds
will provide you with many years of trouble free service. |
|
| Tools You Willl Need |
-
Tape Measure (metal or wood)
-
Pencil
-
Screwdriver
-
Drill and 1/4'' Hex head bit
-
Level (optional)
-
1/16'' or 3/32'' drill bit (optional)
|
|
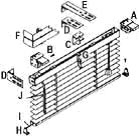
| All parts listed are not included with every blind |
-
Right hand end bracket
-
Left hand end bracket
-
Center support bracket
-
Short extension bracket (optional)
-
Long extension bracket (optional)
-
Standard or delux valance
-
Valance clips
-
Hold down bracket with screws
-
Hold down pins
-
Wand (optional)
|
|
|
 |
|
|
| Step 1. Determining Mounting Method |
|
| Your blind was made to be installed as either an inside or outside mount.
Follow the instructions that apply to your blind. Unpack your new blind and
check the packaging carefully to assure all parts have been removed before
discarding the shipping containers. |
|
Inside Mount
 |
Outside Mount
 |
|
|
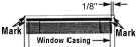
| For an Outside Mount, hold the blind level and centered against the
window casing. Mark the casing with a pencil just below the head rail on each
end. Also mark the window casings 1/8" beyond the ends of the head rail. The
right and left installation brackets will be placed on these marks. Remember to
keep head rail level-even if your window is not! Very Important for optimum
blinds function. |
Outside Mount
 |
| For an Inside Mount make sure the head rail is level and clear of
obstructions. Make pencil marks below the head rail on each end. The right hand
and left hand installation brackets will be placed on these marks. Remember to
keep head rail level- even if you window is not. |
Inside Mount |
| For a Ceiling or Overhead Mount, hold the blind against the ceiling
centered in front of the window and make pencil marls 1/8" beyond the ends of
the head rail. The right and left installation brackets will be placed on these
marks. |
Ceiling or Overhead Mount |
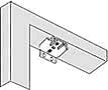
| Step 2. Attach Brackets to Mounting Surface |
|
Caution: Use proper screws the mounting screws
included are for wood or sheet metal surfaces. For other surfaces obtain
appropriate fasteners and install them according to the manufacturer's
instructions.
|
The end brackets may be mounted using two screws in several different
orientations depending on your needs:
|
-
Inside the Jams (inside mount)
-
To the outside face of the window casing or wall (outside mount).
-
Overhead: either to the top inside of the window frame (inside mount) or to the
ceiling. (outside mount)
|
Inside Mount
 |
Outside Mount
 |
Ceiling Mount
 |
|
Use proper screws. Two screws are supplied for each mounting bracket. These are
suitable for sheet metal and wood surfaces. On wood surfaces pre-drill homes
for the screws using a 1/16" diameter drill bit or make a starter hole with a
finishing nail and hammer or awl. One sheet metal surfaces use a 3/32" diameter
steel drill bit. For plaster, drywall, concrete, stone, brick or tile use
appropriate plugs, anchors or screws of the proper type and length. Follow the
manufacturer's instructions.
|
|
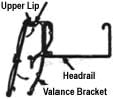
| Open the brackets swivel cover with your thumb or a screwdriver.
Hold the bracket against the mounting surface and align it with the pencil
marks. Using a pencil, mark the location of the two diagonal holes for the
mounting screws. Drill holes for the screws using one for the recommended drill
bits. If working on a wood surface, locate the screws at least 1/4" from the
edge of the wood to prevent splitting. Open cover with screwdriver. |
 |
HINT: Smearing a little bar soap on the screw
threads will make them drive more easily.
|
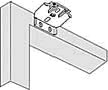
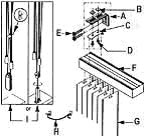
Center support brackets are supplied if required. Space
multiple brackets evenly along head rail. Center support brackets must be
positioned so that they do no interfere with the operation of the blind cord
and ladders. Mount center brackets level with the end brackets.
|
Center Support Bracket
|
Snap the valance clips over the front lip of the head rail before
mounting the blind to the installation brackets. A valance clip is furnished
for every ladder. Install the valance clip next to each ladder. If the clips
are mounted directly in line with the ladders, they may catch on the cords
inside the head rail.
|
|
|
 |
-
1/2'' Aluminum
-
1'' Aluminum
-
2'' Aluminum
-
1'' Premium Wood
|
 |
 |
| Insert the head rail into the end brackets. If an auxiliary
support bracket is used, be sure that it is properly engaged with head rail. |
 |
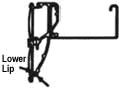
Close the swivel covers to lock the head rail in place.
In the case of 2" blind brackets, it is important to make sure the swivel end
is engaged on the lip on bottom of bracket. |
 |
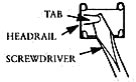
| If your blind is not fitting snugly left to right, open the
mounting brackets and remove the head rail and pry out the tab(s) at the ends
of the head rail a bit with a screw driver. If your blind fits too tightly,
press the tab(s) in with a pair of pliers. Now reinstall the head rail and
close the mounting bracket covers. This option only applies on some headrails. |
 |
Optional Projection Brackets
If you ordered the optional projection brackets, mount them to the wall or
window using two screws. Attach the installation and center brackets using two
machine screws and nuts per bracket. |
 |
| Step 3. Valance Installation |
|
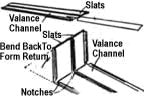
Deluxe Valances With Valance Channel. (optional)
On outside mount blinds, the valance channel is notched or pre-formed on the
backside to allow the ends of the channel to be formed into returns. Bend ends
back to form returns. |
 |
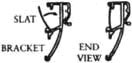
| Starting at one end, place the upper lip of the valance into the
top groove of the valance bracket. Carefully snap the lower lip into the bottom
groove on the bracket. Repeat this at each bracket. Valance return length may
be trimmed with scissors if necessary. |
Top Groove
 |
Bottom Groove |
Standard Valances without Valance Channel
Place the lower edge of the slat into the center groove in the valance bracket.
Now carefully snap the upper edge of the slat into the top groove in the
bracket. Repeat this at each bracket across the blind. The lower valance slat
is installed in the same manner by placing its lower edge into the lower groove
in the valance bracket and carefully snapping the upper edge into the center
groove of the bracket. The slats may be trimmed with scissors if necessary. |
| Upper Valance Slat Installation |
 |
 |
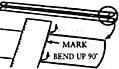
| To bend returns, place the slats on a table with the concave
(back) side up. Measure and mark the return size on each end of the slat. Place
a ruler (or other straight edge) on the mark and hold it firmly in place with
one hand. Place the other hand under the slat and bend it straight up. Install
the valance as previously described. |
Bending Valance Returns
 |
| Step 4. Hold Down Brackets |
|
| Note: Not recommended for single control
blinds. Recommended for OB mount blinds (i.e.: door installation) |
| Holds down brackets are used to keep the bottom of the blind from
swaying and were supplied if requested when ordering the blind. Some blinds
have bottom rail end caps with a hole in the center; on these blinds, push a
hold down pin into the hole in the end caps. |
-
Lower blind completely. Be sure bottom rail is level.
-
Place hold down brackets on bottom rail hold down pins(slotted bracket on the
right, slot down).
-
Mark bracket location on window frame.
-
Remove brackets and raise blind.
-
Drill holes for bracket screws and mount brackets.
-
To secure bottom rail, insert hold down pin into un slotted bracket first.
-
Then snap opposite pin into slotted bracket.
|
 |
| Step 5. Operating A Blind With Two Controls |
|
-
TILT:
Turn wand or pull string to tilt slats to desired angle.
-
RAISE OR LOWER:
Slats should be fully open, not tilted, when raising or lowering. To raise
blind, pull lift cord straight down. To lower blind, pull cord toward center of
blind and slowly raise your hand while holding onto the cord.
-
LOCK:
When cord hangs straight down, the cord lock holds the blind in position.
-
CAUTION: When blind is raised, keep lift cords away from door openings
to prevent tripping hazard.
|
 |
 |
| Step 6. Child Safety |
|
-
Clamp or Clothes Pins
-
Cleat
-
Tie the cord to itself
-
Tie-down device
|
 |

Young children can become entangled and strangle in cords. Keep
all cords out of the reach of children. To avoid strangulation, use these
devices. |
 |
|
|
| Step 7. Cleaning and Care |
|
| We recommend routine dusting with a soft brush, cloth or clean them with a
vacuum cleaner's brush attachment. If blinds become soiled, they may be cleaned
with a soft cloth dampened with warm water. You may want to add a small amount
of mild, non-abrasive liquid soap (I e. Dove, Ivory, etc.) to warm water. It is
also possible to have your blind professionally cleaned. We advise you to
utilize professional window treatment cleaning services if you elect to have
your blinds cleaned by methods other than those suggested above. Our warranty
does not cover damages caused by cleaning services. |
|
|
|
|
| Natural Wood Shades |
|
| How to Install Natural Wood Shades |
|
| Congratulations on your purchase of a natural wood shades.
Your shade has been custom made to your specifications and is one of the finest
window treatments available. Before you un wrap your shades, please take a few
moments to read these instructions. When using tools, make sure you have proper
eye protection. With careful installation and periodic cleaning, your blinds
will provide you with many years of trouble free service. Unpack your new shade
and check the packaging carefully to assure all parts have been removed before
discarding the shipping containers. |
|
| Tools Needed |
-
Tape Measure (metal or wood)
-
Pencil
-
Screwdrivers (flat)
-
Hammer and Finishing nails
-
Drill and 1/4" Hex head bit
-
Level (optional)
-
Scissors
-
1/16" and 7/64" Drill bits
|
|
| All parts listed are not included with every shade |
-
Head rail
-
Valance
-
Shade
-
Pull Cord
-
Tassels 2 Corded Shade
|
|
| Fastening the anchors into various materials: |
| Anchors (not supplied) |
| Plastic or lead anchor insert. |
| Plastic anchor insert for lightweight blinds only, in drywall, paneling, etc. |
| Hollow Wall Anchors (not supplied) |
| Hollow wall anchor for heavy blinds. |
| Hollow wall toggle bolt for heavy blinds. |
|

 |
|
 |
|
|
| Step 1. Determining Mounting Method |
|
| Your natural wood shade is custom made using the finest
materials available. Each shade includes all necessary installation hardware
and has been checked for operation and alignment. The following instructions
are for the three most common installation types. |
|
Inside Mount
 |
Outside Mount
 |
|
|
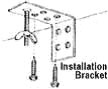
| Step 2. Attach Brackets to Mounting Surface |
|
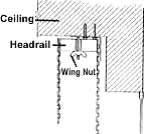
| Inside Mount |
| Inside Hang (ceiling mounted) - Shade is measured and assembled to fit inside
window casement with mounting bracket that is installed to top of casing with
screws placed at opposite corners. The wing nuts are removed. The screws slide
through the slots on the head rail and are secured by a wing nut. |
|
 |
|
| Ceiling Mount |
| Outside Hang (ceiling mounted) - Shade is measured and assembled to overlap the
window casing. The mounting brackets are then installed to the ceiling by means
of screws or toggle bolts placed at opposite corners. Remove wing nuts. The
screws slide through the head rail slots and are secured with wing nuts. |
|
 |
|
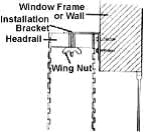
| Outside Mount |
| Outside Hang (wall mounted) - Shade is measured and assembled to overlap the
window casing. The mounting brackets are then installed to the wall by means of
screws or toggle bolts placed at opposite corners. Remove wing nuts. The screws
slide through the head rail slots and are secured with wing nuts. |
|
 |
|
|
| Step 3. Natural Shade Operation & Adjustment |
|
| Yarn and wood used on these fabrics have been specially
selected. The wood slats retain the grain texture and irregularities inherent
in natural wood of this type. The selection of pattern and yarns combines this
natural wood with the most contemporary colors for a truly unique window
fabric. |
|
| Shade Operation |
| Both Roman & Roll-Up shades has the same basic hardware and operating
procedure. Cords, whether installed on the left or right side have the same
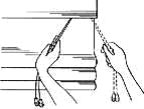
locking mechanisms. To raise the shade merely pull on the cord and release the
cord when the shade is at the desired height. To lower the shade, pull the cord
to the center of the shade with a slight tug. Then keep tension on the cord at
that angle and slowly let the cord go up, thus lowering the shade. If the shade
should bind, check the cord alignment over the pulley (under valance). |
|
 |
|
| Shade Adjustment & Alignment |
| Your shade has been carefully inspected and adjusted by the factory, but minor
adjustments may be necessary once it has been installed. The yarns in your
woven shades are flexible enough to permit minor adjustment horizontally and
vertically for proper alignment on your window. If the bottom of your shade
becomes uneven, merely pull down on either side to stretch the yard and align
the shade, But Be Careful. Pull Lightly! |
|
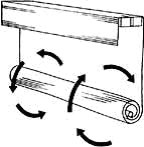
| If your shade doesn't lie flat against the wall or window, roll the shade
tightly from the bottom and twist roll clockwise on one side, counter clockwise
on the other, and this will align yarns and slats. Should a strand of yarn slip
off the edge of the shade, remove the strand from the top to bottom - this will
in no way affect the strength of the shade. |
|
 |
|
|
| Step 4. Child Safety |
|
-
Clamp or Clothes Pins
-
Cleat
-
Tie the cord to itself
-
Tie-down device
|
 |

Young children can become entangled and strangle in cords. Keep
all cords out of the reach of children. To avoid strangulation, use these
devices. |
 |
|
|
| Step 5. Cleaning and Care |
|
| Periodic vacuuming with a brush attachment is all that is normally needed to
insure lasting beauty. It is recommended woven woods be treated with stain
repellent to minimize cleaning. With proper care and maintenance, natural woods
should last for years. |
|
|
|
|
| Roller Shades |
|
| How to Install Roller Shades |
|
| Congratulations on your purchase of a roller shade. Your
shade has been custom made to your specifications and is one of the finest
window treatments available. Before you unwrap your shades, please take a few
moments to read these instructions. When using tools, make sure you have proper
eye protection. With careful installation and periodic cleaning, your blinds
will provide you with many years of trouble free service. Unpack your new shade
and check the packaging carefully to assure all parts have been removed before
discarding the shipping containers. |
|
| Tools Needed |
-
Tape Measure (metal or wood)
-
Pencil
-
Screwdrivers (flat and phillips)
-
Carpenter's Level
-
1/4" Hex Head
|
|
| All parts listed are not included with every shade |
-
Brackets
-
Clutch Mechanism
-
Beaded Cord Loop
-
Fabric
|
|
|
 |
|
|
| IMPORTANT NOTE: Screws
provided are for installation into wooden frames only. For metal surfaces, use
suitable sheet metal screws and pre-drill holes. For concrete, stone, brick, or
tile use a carbide drill and appropriate anchors and screws. For wallboard or
plaster, use hollow wall anchors and/or longer screws to each framing or stud. |
|
| Step 1. Determining Mounting Method |
|
| Your roller shade is custom made using the finest
materials available. Each shade includes all necessary installation hardware
and has been checked for operation and alignment. The following instructions
are for the three most common installation types. |
|
Inside Mount
 |
Outside Mount
 |
|
|
| Step 2. Attach Brackets to Mounting Surface |
|
| Inside Mount |
| The roller shade, when mounted should not make contact with the top of the
window frame or any other obstruction when raised and lowered. Position the
mount brackets inside the window frame. The brackets need to be aligned and
level with one another. When the shade is installed it should move freely
between the brackets. |
|
 |
|
| Ceiling Mount |
| The roller shade, when mounted should not make contact with the top of the
ceiling or any other obstruction when raised and lowered. Position the mount
brackets on the ceiling. The brackets need to be aligned and level with one
another. When the shade is installed it should move freely between the
brackets, be sure to allow 1/8" of additional space between the brackets so the
mechanism will rotate freely. |
|
 |
|
| Outside Mount |
| The roller shade, when mounted should not make contact with the top of the
window frame or any other obstruction when raised and lowered. Position the
mount brackets outside the window frame. The brackets need to be aligned and
level with one another. When the shade is installed it should move freely
between the brackets, be sure to allow 1/8" of additional space between the
brackets so the mechanism will rotate freely. |
|
 |
|
|
| Spring Roller |
|
| Mount the left bracket slotted end up. the right bracket is
mounted reversed. For reverse roll mount brackets reversed. |
|
| Step 3. Roller Shade Operation & Adjustment |
|
| Shade Operation |
Continuous Loop
After mounting brackets, press the plastic inserts into the brackets. Place the
shade in the plastic insert/bracket. Place the round pin of the roller into the
plastic insert/ bracket.
Spring Roller
Put the shade into the brackets. insert round end pin into circle hole. Insert
the other end into the slot on the other bracket.
|
|
|
 |
|
| Shade Operation |
Continuous Loop
The clutch cover may be removed to adjust the position of the chain stop.
Spring Roller
Lower the shade 16" from the top to tighten spring. Lift the shade off the
bracket and roll up. Place the shade back in the brackets and check whether the
spring is tight enough. Note: too much tension may damage the roller.
|
|
|
 |
|
|
| Step 4. Child Safety |
|
-
Clamp or Clothes Pins
-
Cleat
-
Tie the cord to itself
-
Tie-down device
|
 |

Young children can become entangled and strangle in cords. Keep
all cords out of the reach of children. To avoid strangulation, use these
devices. |
 |
|
|
| Step 5. Cleaning and Care |
|
| Periodic vacuuming with a brush attachment is all that is normally needed to
insure sheer weave lasting beauty. It is recommended to use a damp cloth or
sponge to wipe off dust to keep the room-darkening vinyl shade in long lasting
beauty. |
|
|
|
|
| Roman Shades |
|
| How to Install Roman Shades |
|
| Congratulations on your purchase of a roman shades. Your
shade has been custom made to your specifications and is one of the finest
window treatments available. Before you un wrap your shades, please take a few
moments to read these instructions. When using tools, make sure you have proper
eye protection. With careful installation and periodic cleaning, your blinds
will provide you with many years of trouble free service. Unpack your new shade
and check the packaging carefully to assure all parts have been removed before
discarding the shipping containers. |
|
| Tools Needed |
-
Tape Measure (metal or wood)
-
Pencil
-
Screwdriver
-
Drill
-
Level
-
Scissors
-
Drill bits (1/16" and 7/64")
|
|
| Hardware Included |
-
Installation Brackets
-
Mounting Screws
-
Additional Mounting Brackets(If required for extra support)
|
|
|
|
|
| Fastening the anchors into various materials: |
|
The screws provided are for mounting the shade to a wood
surface only. For other surfaces, use the following: (not supplied)
Wallboard or Plastic - Pre-drill holes for suitable hollow wall anchors
or toggle bolts.
Metal Surfaces - Pre-drill holes and use short metal screws.
For Concrete, Stone, Brick or Tile - Use a carbide drill and appropriate
plugs, or anchor with screws. |
|
| Step 1. Determining Mounting Method |
|
| Your roman shade is custom made using the finest materials
available. Each shade includes all necessary installation hardware and has been
checked for operation and alignment. The following instructions are for the
three most common installation types. |
|
Inside Mount
 |
Outside Mount
 |
|
|
| If shade is for inside window installation, and if the
window frame is not even or level, use shims to make sure that the head rail
will be level when installed. |
|
|
|
|
| Even if the head rail is mounted on the frame, wall or
ceiling, it must be level, so the shade will operate properly. Also make sure
that shade is the proper length and that it will clear any obstructions.
(Spacers or extension brackets may be required for shade to clear any
obstructions.) |
|
| Step 2. Attach Brackets to Mounting Surface |
|
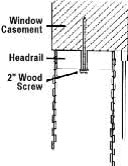
| Inside Mount |
| Note: If installation brackets (included) are used for inside mount, refer to
"Ceiling Installation". Otherwise, see below for mounting instructions.
Inside Hang (ceiling mounted) - Shade is fabricated to fit inside the window
casement.Hold head rail level against the top of the casement, lower the shade
to make sure it is the correct height, and that shade clears any obstructions.
(Shimming may be required to level shade.) While holding the head rail firmly
against the casement, drill 1/16" pilot holes into the casement through the
small round holes in the head rail. (Do not drill pilot holes through the slots
in the head rail.) Use the 2-inch wood screws to attach the shade to the window
casement. If shim is used to level head rail, make sure that it is in place
before tightening screws. |
|
 |
|
| Ceiling Mount |
Outside Hang (ceiling mounted) - Shade is fabricated to overlap the window
opening. The installation brackets are mounted to the ceiling. Hold head rail
against the ceiling. Lower shade, check for correct length. Position shade so
that it clears any obstructions. While holding the head rail against the
ceiling, lightly mark on the ceiling surface the positions of the head rail
slots.
Hold each installation bracket against the ceiling and mark for two diagonal
screw holes. Position brackets to line up with centers of slots in head rail.
Drill pilot holes and use appropriate fastener screws, wall anchors or toggle
bolts to mount brackets. Push the head rail up onto the brackets so that the
threaded posts on the brackets fit through the slots in the head rail. Secure
the head rail to installation brackets by tightening wing nuts. |
|
 |
|
| Outside Mount |
Outside Hang (wall mounted) - Shade is fabricated to overlap the window
opening. The installation brackets are mounted to window frame or wall. Hold
head rail level. Lower shade, check for correct length, and that shade clear
any obstructions. (Spacers or extension brackets may be required to clear any
obstructions.) While holding the head rail level against the window frame or
wall, lightly mark on the mounting surface the positions of the head rail
slots.
Hold each installation bracket against the mounting surface and mark for two
diagonal screw holes. Position brackets to line up with centers of slots in
head rail. Drill pilot holes and use appropriate fastener screws, wall anchors
or toggle bolts to mount brackets. Push the head rail up onto the brackets so
that the threaded posts on the brackets fit through the slots in the head rail.
Secure the head rail to installation brackets by tightening wing nuts. |
|
 |
|
|
| Step 3. Roman Shade Operation & Adjustment |
|
| Shade Operation |
| Your shade is equipped with a locking mechanism that holds the shade at the
desired height. To raise or lower the shade, pull and angle the lift cords
toward the middle of the shade. A slight tug will release the cord lock
allowing shade to be moved up or down. To lock the shade at the desired height,
angle the lift cord outward to the side to engage the cord lock. If the shade
should bind during raising or lowering, check the lift cords for proper
alignment on the pulleys (under valance). |
|
|
 |
|
| Shade Adjustment & Alignment |
| Your shade has been carefully inspected and adjusted to operate properly. Once
installed however, minor adjustments may be necessary. The yarn in your Roman
Shade is flexible enough to straighten to window opening by stretching the
yarn. Pull down on the short side on the bottom to eliminate unevenness and
align the shade. If the shade is not flat when lowered, roll the shade tightly
from the bottom and then twist the roll from the ends (one end clockwise and
the other counter-clockwise) to align yarn and slats. Should a strand of yarn
slip out from the edge of the Roman Shade fabric, it may be removed with
scissors (from top to bottom of shade) without affecting the strength of the
shade. |
|
|
 |
|
|
| Step 4. Child Safety |
|
-
Clamp or Clothes Pins
-
Cleat
-
Tie the cord to itself
-
Tie-down device
|
 |

Young children can become entangled and strangle in cords. Keep
all cords out of the reach of children. To avoid strangulation, use these
devices. |
 |
|
|
| Step 5. Cleaning and Care |
|
| Occasional dusting or vacuuming with a brush attachment is all that is
necessary to keep your shade looking new. |
|
|
|
|
| Vertical Blinds |
|
| How to Install Vertical Blinds |
|
| Congratulations on your purchase of a vertical window
blinds. Your shade has been custom made to your specifications and is one of
the finest window treatments available. Before you un wrap your shades, please
take a few moments to read these instructions. When using tools, make sure you
have proper eye protection. With careful installation and periodic cleaning,
your blinds will provide you with many years of trouble free service. Unpack
your new shade and check the packaging carefully to assure all parts have been
removed before discarding the shipping containers. |
|
| Tools Needed |
-
Tape Measure (metal or wood)
-
Pencil
-
Screwdrivers (flat)
-
Hammer and Finishing nails
-
Drill and 1/4" Hex head bit
-
Level (optional)
-
Scissors
-
1/16'' or 3/32'' drill bits
|
|
| All parts listed are not included with every shade |
-
Wall Bracket
-
Nuts
-
Mounting Clips
-
Bolts
-
Mounting Screws
-
Head rail
-
Louvers or Vanes
-
Chain and Clip
-
Cord Weight or Cord Clip
|
|
| Fastening the anchors into various materials: |
Anchors (not supplied)
Plastic or lead anchor insert.
Plastic anchor insert for lightweight blinds only, in drywall, paneling, etc. |
|
 |
Hollow Wall Anchors (not supplied)
Hollow wall anchor for heavy blinds.
Hollow wall toggle bolt for heavy blinds. |
|
 |
|
 |
|
|
| Step 1. Determining Mounting Method |
|
| Your vertical window blind is custom made using the finest materials available.
Each blind includes all necessary installation hardware and has been checked
for operation and alignment. The following instructions are for the two most
common installation types. |
|
Inside Mount
 |
Outside or Ceiling Mount
 |
|
|
|
| Inside Mount Mounted on Horizontal Surface (Ceiling
or Upper inside Door/Window Frame) |
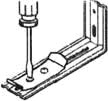
| Mounting clips may come to you attached to the mounting brackets. The brackets
are not used with this way of mounting. Loosen and remove the screw on the
bottom of the bracket. If your bracket has two screws, remove both of them. Do
this on all brackets. Discard brackets and adjusting screws and keep just the
clips. |
|
 |
|
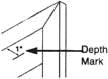
| You will need to make marks on two things. One is your door/window frame or
ceiling and the other is the valance. For marks on your door/window frame or
ceiling, hold your valance up, centered over door or window and mark the width
of your valance (Width Mark). At the valance width marks you just made,
measure out 1" from wall and make pencil marks (Depth Marks) |
|
 |
|
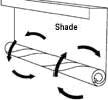
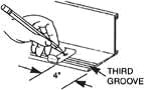
| Center and clip over the third groove and about 4" or less from each end. For
blinds over 62", evenly space all additional clips and mark all hole locations. |
|
 |
|
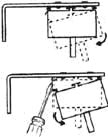
| Hold valance up. Line back of dust cover (on valance) up with Depth Marks.
Drill holes through valance at the mounting hole marks. If mounting into dry
wall, use wall anchors (not included) and push into drilled holes. Hold valance
and clips up to the holes and drive screws through clip and valance and into
your ceiling or sill. |
|
 |
|
| Snap head rail in pace by inserting front edge in mounting clips and rotating
back. (note: Pull cord on right for right draw and left for left draw). To
remove blind, release head rail by inserting a screwdriver between head rail
and release tab. |
|
 |
|
| Outside Mount Mounted on a Vertical Surface (Wall,
Window or Door Frame) |
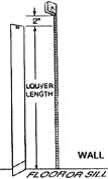
| Mark "Height" on wall at Louver Length + 2". Center head rail over window at
"Height" mark. Make about a 2" long mark on wall about 4" in from each end. For
blinds over 62" wide, make marks on wall for every bracket. Spaced evenly |
| Wide |
Brackets |
| 0 - 62" |
2 |
| 62" - 98" |
3 |
| 98" - 134" |
4 |
| 134" - 170" |
5 |
| 170" - 192" |
6 |
|
|
 |
|
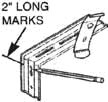
| Hold brackets up to 2" marks and mark mounting holes on wall. You may find it
easier to mark wall and mount wall brackets, if the clip is twisted out of the
way. For brackets with two screws, remove one screw and loosen the other then
twist clip 1/4 turn. |
|
 |
|
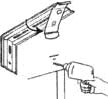
| Droll holes at these marks. if mounting into drywall, use wall anchors (not
included) and push into drilled holes. Screw brackets into place. Use 2 screws
per bracket. |
|
 |
|
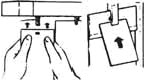
| Twisted all clips back to original position and tighten all screws. Snap head
rail in place by inserting front edge in mounting clips and rotating back.
(Note: Put cord on right for right draw and on left for left draw). To remove
blind, release head rail by inserting a screwdriver between head rail and
release tab. |
|
 |
|
|
| Step 2. Attaching the Louver or Vanes |
|
| Install the Louvers |
| Rotate stems so that you can see through the stem slots. Push louvers up into
stem. Gently pull down on louver to insure it catches on stem hook. For cloth
louvers all hems should face the same direction. If louvers will not rotate,
check to see if all louvers are overlapped the same. If not, remove louvers and
carefully reinstall them. Remove louver by inserting credit card. |
|
 |
|
| Install Bottom Hardware (optional) |
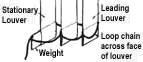
| For Fabric Louvers With Sewn In Weights: Chains may be installed to the
front or rear of the louvers. Slide clip onto fabric louver at the location
shown to left. For Fabric Louvers With Standard Weights: If weights are
not sewn into pockets, insert weights in pockets at bottom of louvers. Attach
clips to front holes of weights starting with louver at the stationary end of
the blind. At the leading louver, drape chain across face louver and attach
clips to back holes of weights. Thread loose end of chain through one loop on
the tie down clip. Join chain ends using chain connector. Attach clip to window
casing or floor with screw. |
|
 |
|
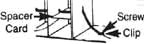
| For PVC Louvers With Keyholes Located At The Center Of The Louver: Keep
spacing with spacer card. Attach tie down clip to end of bead chain. Screw clip
to floor. |
|
 |
|
|
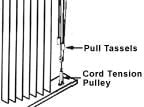
| Step 3. Attaching the Tension Pulley |
|
| Tension Pulley (Standard) |
To Avoid Strangulation, A cord Weight or Cord Tension Pulley should be
attached to the cord and then secured to the wall. Two pull tassels should be
attached to the chain.
Install Cord Tension Pulley, Note: Do Not Pre-Drill Holes.For inside
mounts, pulley should be positioned toward back of sill so that it will not
interfere with the louver rotation. |
|
 |
|
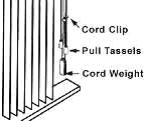
| Cord Weight and Cord Clip With EZ Open Option (Optional) Install Cord
Clip, Position cord clip on wall above the cord weight and screw into position. |
|
 |
|
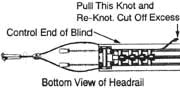
Shorten Cord
If the cord is too long you may adjust it. Traverse louver holders to stacked
position. Grasp knot located along the inside of the track and pull out excess
cord. Re-knot and cut-off excess. |
|
 |
|
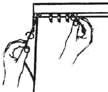
Remove Cord Twist
After you mount your blind, your cords may be twisted together. Follow these
instructions to untwist them. Open blind all the way. Pull out the knot that is
farthest away from the end with the cords and chain. Use needle nose pliers, if
you have one, to get at the knot. Hold the cord near the knot and the cord near
the drive end and twist both of them in the same direction. Try twisting one
way and then the other until you find the right way to untwist the cord. Pull
the cords on the end of the blind to get the knot back inside the blind. |
|
 |
|
|
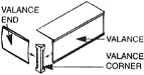
| Step 4. Valance Cover (optional) |
|
-
Valance
-
Valance Corners
-
Valance Returns
-
Valance Clips
|
For Round Corner Valance
Unfold fabric from valance ends. Push the side of the corner onto the valance
ends. It should fit snug behind the trim.Wrap fabric around the corners and
slide valance returns over fabric and onto corner. |
|
 |
|
Valance Corner Assembly
For standard corner valance insert valance ends into valance corners and attach
to valance. |
|
 |
|
Attach Dust Cover Valance
for outside mounting snap one clip onto head rail about 2" from each end. Space
remaining clips evenly on head rail. Slip valance into clips. |
|
 |
|
Single Valance: Outside Mount
Snap valance clips (1) on to head rail (2) about 2" from each end. Space
remaining clips evenly onto head rail. Slide valance onto clips. Note: For clip
with notches on its tab, break the tab along notch so that the valance will fit
better on window. |
|
 |
|
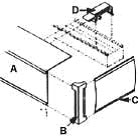
Double Valance: Outside Mount
Clip valance hangers (1) to the back of the double valance so that the "T" (3)
section of the hangers fit into the trim groove (4).Install the lower edge of
the hanger into the lower slot as shown. |
|
 |
|
| Flex the upper edge of the valance hanger (1) to snap it into the top back edge
of the upper valance (3). Repeat for returns, one hanger per return.Mount
finished double valance onto head rail same as single valance. |
|
 |
|
|
| Step 5. Vertical Blind Operation |
|
| Rotate the vanes by pulling the chain until the vanes are in the desired
position. Always rotate the vanes with the chain to the open position before
you open the blind with the traverse cord. To align the vanes, rotate them from
front to back by pulling the chain once in each direction. Pull the traverse
cord to open and close the blind. open the blind before traversing the vanes
will jam if you traverse them while the blind is closed. |
|
|
|
| Step 6. Child Safety |
|
-
Clamp or Clothes Pins
-
Cleat
-
Tie the cord to itself
-
Tie-down device
|
 |

Young children can become entangled and strangle in cords. Keep
all cords out of the reach of children. To avoid strangulation, use these
devices. |
 |
|
|
| Step 7. Cleaning and Care |
|
| Fabric Vanes: Periodic vacuuming will keep the fabric fresh. Although fabric
vanes are treated with a soil repellant, spot clean any stains by applying a
mild soap and warm water solution with a sponge or cloth. General rules when
cleaning any vanes are to clean one vane at a time. Detach one vane and place
it on a flat surface. Clean as specified. Attach the vane back on the head
rail. Soaking vanes may cause them to lose their seizing, fire retardant, and
soil repellant additives. Never use hot water to clean vanes. Never machine
wash or dry clean the vanes. Never use a solvent cleaner. Never use a dryer, or
hang or fold vanes over a clothes line. Never wring crush vanes to dry them. |
|
| PVC Vanes: Apply a mild soap and cold or warm water solution with a soft cloth
or sponge. Abrasive or strong cleansers may scratch or mar the vanes surface.
Dry with a cloth towel to avoid water marks. |
|
|
|
|