|
| Vienna Shades |
|
| How to Install Vienna Shades |
|
| Congratulations on your purchase of a Vienna shade. Your
shade has been custom made to your specifications and is one of the finest
window treatments available. Before you un wrap your shades, please take a few
moments to read these instructions. When using tools, make sure you have proper
eye protection. With careful installation and periodic cleaning, your blinds
will provide you with many years of trouble free service. Unpack your new shade
and check the packaging carefully to assure all parts have been removed before
discarding the shipping containers. |
|
| Tools You Willl Need |
-
Tape Measure (metal or wood)
-
Pencil
-
Screwdriver (flat and phillips)
-
Carpenter's Level
-
Hex Head
|
|
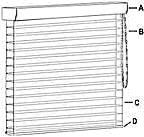
| All of these parts are included with every blind. |
-
Head rail
-
Continuous Cord Loop
-
Fabric
-
Bottom Rail
|
|
|
 |
|
|
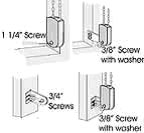
| IMPORTANT NOTE: Screws
provided are for installation into wooden frames only. For metal surfaces, use
suitable sheet metal screws and pre-drill holes. For concrete, stone, brick, or
tile use a carbide drill and appropriate anchors and screws. For wallboard or
plaster, use hollow wall anchors and/or longer screws to each framing or stud. |
|
|
| Step 1. Determining Mounting Method |
|
| Your Vienna shade is custom made using the finest materials available. Each
shade includes all necessary installation hardware and has been checked for
operation and alignment. The following instructions are for the three most
common installation types. |
|
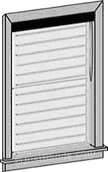
Inside Mount
 |
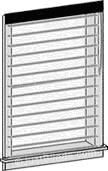
Outside Mount
 |
|
|
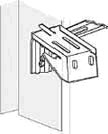
| Step 2. Attach Brackets to Mounting Surface |
|
Inside Mount
The Vienna shade for shallow mount a minimum 5/8" and for flush inside mount a
minimum 3 3/16" (shown in the picture on the right A). To ensure that the head
rail is mounted level, use the shims (show in the picture on the right B). |
 |
|
Fully Recessed Inside Mount
Low light gap wedges can be used to reduce the top light gap when the shade is
mounted fully recessed. The wedge is placed between the mounting surface and
the bracket with the tabs on the wedge facing down and the thick end of the
wedge toward the back of the bracket. |
 |
|
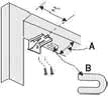
Side Mount
Measure from window sill up to desired mounting position on each side of the
window frame. Mark position. Mount side mount brackets on each side of window
frame as shown. Make sure to confirm that head rail will sit perfectly level.
Once side mount brackets are installed and properly positioned, attach the
standard mount brackets using the nuts and bolts provided.
Position screw in center of slot so you can adjust position of bracket as
necessary. |
 |
|
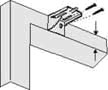
Outside Mount
The minimum for mounting bracket surface is 3/4".
The extension bracket is optional. Optional brackets are used to project the
back of the shading up to 2 1/2" from the mounting surface. Attach the Standard
Mounting bracket to the Extension Bracket with the nut and bolt provided. The
minimum required for extension bracket surface is 2". |
 |
|
|
|
| Step 3. Hanging The Shade |
|
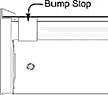
Bump Stops
Before installing the shading, it is important to check the position of the
bump stops inside the head rail. There are two stops which prevent the bottom
rail from traveling too far into the head rail. These bump stops need to be at
the ends of the head rail, butting up to the end cap. This will prevent the
bottom rail from stacking unevenly in the head rail. |
 |
| Push the rail back until it is fully engaged. |
 |
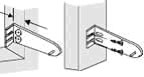
Un-Install Head rail
To remove the shading, partially lower the shading and insert a flat head
screwdriver as shown. Twist the screwdriver until the head rail disengages from
the bracket. |
 |
Cord Tension Installation
Lower the shading. Choose one of the three installation methods shown to
position the tension device on the window frame or the wall so that the tension
device and the control cord do not interfere with shade operation.
The control cord must be taut but still operable. Do not allow for any slack. Do
not twist or cross the control cord. |
 |
Hold Down Installation (optional)
Use the pin on the hold down bracket to punch out the front hole on the bottom
rail end cap. (For the inside hold down bracket a maximum of 1" surface.)
Mount the hold down to the side or back of the window frame so that the pin
lines up with the front hole in the bottom rail end cap with the shade fully
lowered and fully open.
Lower the shading and flex the hold down bracket outward so that the pin can be
inserted into the hole in the end cap. |
 |
| Step 4. Shade Operation & Adjustment |
|
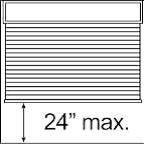
Shade Operation
Pulling down on the back cord will lower the shading. When the window shading
is completely lowered, pulling down on the back cord will open the vanes.
Continued pulling in this direction will raise the fabric with the vanes in the
open position. The window shading must only be raised a maximum of 24" in this
manner to avoid damaging the fabric. There is a stop pre-set on the
bead chain to allow 24" of the reverse roll up. There is no stop on the
polyester cord option. DO NOT reverse roll more than 24".
Pulling down on the front cord will close the vanes and then raise the shading. |
 |
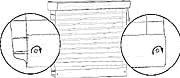
Shade Equalization Alignment
After installation, the shade may shift to one side as it rolls up, and require
adjustment at the bottom rail. Flip the bottom rail up so you can see the
bottom of the rail. If the fabric is moving to the right (or the right side of
the bottom rail is higher than the left), turn the left side screw clockwise.
If the fabric is moving to the left (or the left side of the bottom rail is
higher than the right), turn the right side screw clockwise. |
 |
| Step 5. Child Safety |
|
The Consumer Product Safety Commission requires the use of
a cord tie down (cord tension) on all continuous loop cord systems. The use of
such a device is intended to significantly reduce the occurrence of infant or
small child strangulation injuries or deaths resulting from the looped pull
cords on various window treatment products.
The Cord Tension is installed on the Lift Cord before packaging. The Tensioning
device should be mounted in the proper position to pull the cord taut in order
to reduce the possibility of injury. |
|
-
Clamp or Clothes Pins
-
Cleat
-
Tie the cord to itself
-
Tie-down device
|
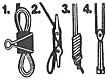 |

Young children can become entangled and strangle in cords. Keep
all cords out of the reach of children. To avoid strangulation, use these
devices. |
 |
|
|
| Step 6. Cleaning and Care |
|
The soft and delicate feel of Sheer Horizontal Window Shadings belies the
durability of the material. Sheer Horizontal is created from sturdy, knitted
polyester fabric and may be feather dusted or vacuumed at a low suction
setting. Spots or stains can be rubbed clean with a damp sponge and mild soap.
To avoid discoloration of the material, we recommend against the use of
chemical cleaners. If necessary the shading may be professionally
ultrasonically cleaned.
All knitted fabrics experience weave variations due to heat, humidity and other
room conditions. These variations can result in slight bowing, puckering and
dimpling of the Sheer Horizontal material. The possible variations are minor
and have been shown through case study not to detract from the beauty of this
product. |
|
|
|