| Roller Shades |
|
| How to Install Roller Shades |
|
| Congratulations on your purchase of a roller shade. Your
shade has been custom made to your specifications and is one of the finest
window treatments available. Before you unwrap your shades, please take a few
moments to read these instructions. When using tools, make sure you have proper
eye protection. With careful installation and periodic cleaning, your blinds
will provide you with many years of trouble free service. Unpack your new shade
and check the packaging carefully to assure all parts have been removed before
discarding the shipping containers. |
|
| Tools Needed |
-
Tape Measure (metal or wood)
-
Pencil
-
Screwdrivers (flat and phillips)
-
Carpenter's Level
-
1/4" Hex Head
|
|
| All parts listed are not included with every shade |
-
Brackets
-
Clutch Mechanism
-
Beaded Cord Loop
-
Fabric
|
|
|
 |
|
|
| IMPORTANT NOTE: Screws
provided are for installation into wooden frames only. For metal surfaces, use
suitable sheet metal screws and pre-drill holes. For concrete, stone, brick, or
tile use a carbide drill and appropriate anchors and screws. For wallboard or
plaster, use hollow wall anchors and/or longer screws to each framing or stud. |
|
| Step 1. Determining Mounting Method |
|
| Your roller shade is custom made using the finest
materials available. Each shade includes all necessary installation hardware
and has been checked for operation and alignment. The following instructions
are for the three most common installation types. |
|
Inside Mount
 |
Outside Mount
 |
|
|
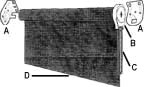
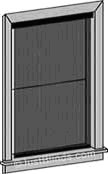
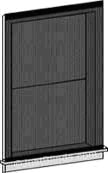
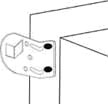
| Step 2. Attach Brackets to Mounting Surface |
|
| Inside Mount |
| The roller shade, when mounted should not make contact with the top of the
window frame or any other obstruction when raised and lowered. Position the
mount brackets inside the window frame. The brackets need to be aligned and
level with one another. When the shade is installed it should move freely
between the brackets. |
|
 |
|
| Ceiling Mount |
| The roller shade, when mounted should not make contact with the top of the
ceiling or any other obstruction when raised and lowered. Position the mount
brackets on the ceiling. The brackets need to be aligned and level with one
another. When the shade is installed it should move freely between the
brackets, be sure to allow 1/8" of additional space between the brackets so the
mechanism will rotate freely. |
|
 |
|
| Outside Mount |
| The roller shade, when mounted should not make contact with the top of the
window frame or any other obstruction when raised and lowered. Position the
mount brackets outside the window frame. The brackets need to be aligned and
level with one another. When the shade is installed it should move freely
between the brackets, be sure to allow 1/8" of additional space between the
brackets so the mechanism will rotate freely. |
|
 |
|
|
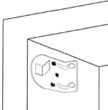
| Spring Roller |
|
| Mount the left bracket slotted end up. the right bracket is
mounted reversed. For reverse roll mount brackets reversed. |
|
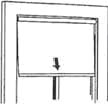
| Step 3. Roller Shade Operation & Adjustment |
|
| Shade Operation |
Continuous Loop
After mounting brackets, press the plastic inserts into the brackets. Place the
shade in the plastic insert/bracket. Place the round pin of the roller into the
plastic insert/ bracket.
Spring Roller
Put the shade into the brackets. insert round end pin into circle hole. Insert
the other end into the slot on the other bracket.
|
|
|
 |
|
| Shade Operation |
Continuous Loop
The clutch cover may be removed to adjust the position of the chain stop.
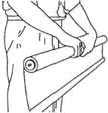
Spring Roller
Lower the shade 16" from the top to tighten spring. Lift the shade off the
bracket and roll up. Place the shade back in the brackets and check whether the
spring is tight enough. Note: too much tension may damage the roller.
|
|
|
 |
|
|
| Step 4. Child Safety |
|
-
Clamp or Clothes Pins
-
Cleat
-
Tie the cord to itself
-
Tie-down device
|
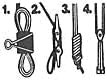 |

Young children can become entangled and strangle in cords. Keep
all cords out of the reach of children. To avoid strangulation, use these
devices. |
 |
|
|
| Step 5. Cleaning and Care |
|
| Periodic vacuuming with a brush attachment is all that is normally needed to
insure sheer weave lasting beauty. It is recommended to use a damp cloth or
sponge to wipe off dust to keep the room-darkening vinyl shade in long lasting
beauty. |
|