|
| Horizontal Blinds |
|
| How to Install Horizontal Blinds |
|
| Congratulations on your purchase of a horizontal blind.
Your blind has been custom made to your specifications and is one of the finest
window treatments available. Before you un wrap your blinds, please take a few
moments to read these instructions. When using tools, make sure you have proper
eye protection. With careful installation and periodic cleaning, your blinds
will provide you with many years of trouble free service. |
|
| Tools You Willl Need |
-
Tape Measure (metal or wood)
-
Pencil
-
Screwdriver
-
Drill and 1/4'' Hex head bit
-
Level (optional)
-
1/16'' or 3/32'' drill bit (optional)
|
|
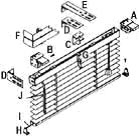
| All parts listed are not included with every blind |
-
Right hand end bracket
-
Left hand end bracket
-
Center support bracket
-
Short extension bracket (optional)
-
Long extension bracket (optional)
-
Standard or delux valance
-
Valance clips
-
Hold down bracket with screws
-
Hold down pins
-
Wand (optional)
|
|
|
 |
|
|
| Step 1. Determining Mounting Method |
|
| Your blind was made to be installed as either an inside or outside mount.
Follow the instructions that apply to your blind. Unpack your new blind and
check the packaging carefully to assure all parts have been removed before
discarding the shipping containers. |
|
Inside Mount
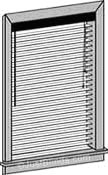 |
Outside Mount
 |
|
|
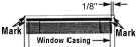
| For an Outside Mount, hold the blind level and centered against the
window casing. Mark the casing with a pencil just below the head rail on each
end. Also mark the window casings 1/8" beyond the ends of the head rail. The
right and left installation brackets will be placed on these marks. Remember to
keep head rail level-even if your window is not! Very Important for optimum
blinds function. |
Outside Mount
 |
| For an Inside Mount make sure the head rail is level and clear of
obstructions. Make pencil marks below the head rail on each end. The right hand
and left hand installation brackets will be placed on these marks. Remember to
keep head rail level- even if you window is not. |
Inside Mount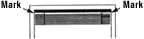 |
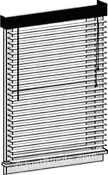
| For a Ceiling or Overhead Mount, hold the blind against the ceiling
centered in front of the window and make pencil marls 1/8" beyond the ends of
the head rail. The right and left installation brackets will be placed on these
marks. |
Ceiling or Overhead Mount |
| Step 2. Attach Brackets to Mounting Surface |
|
Caution: Use proper screws the mounting screws
included are for wood or sheet metal surfaces. For other surfaces obtain
appropriate fasteners and install them according to the manufacturer's
instructions.
|
The end brackets may be mounted using two screws in several different
orientations depending on your needs:
|
-
Inside the Jams (inside mount)
-
To the outside face of the window casing or wall (outside mount).
-
Overhead: either to the top inside of the window frame (inside mount) or to the
ceiling. (outside mount)
|
Inside Mount
 |
Outside Mount
 |
Ceiling Mount
 |
|
Use proper screws. Two screws are supplied for each mounting bracket. These are
suitable for sheet metal and wood surfaces. On wood surfaces pre-drill homes
for the screws using a 1/16" diameter drill bit or make a starter hole with a
finishing nail and hammer or awl. One sheet metal surfaces use a 3/32" diameter
steel drill bit. For plaster, drywall, concrete, stone, brick or tile use
appropriate plugs, anchors or screws of the proper type and length. Follow the
manufacturer's instructions.
|
|
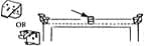
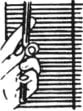
| Open the brackets swivel cover with your thumb or a screwdriver.
Hold the bracket against the mounting surface and align it with the pencil
marks. Using a pencil, mark the location of the two diagonal holes for the
mounting screws. Drill holes for the screws using one for the recommended drill
bits. If working on a wood surface, locate the screws at least 1/4" from the
edge of the wood to prevent splitting. Open cover with screwdriver. |
 |
HINT: Smearing a little bar soap on the screw
threads will make them drive more easily.
|
Center support brackets are supplied if required. Space
multiple brackets evenly along head rail. Center support brackets must be
positioned so that they do no interfere with the operation of the blind cord
and ladders. Mount center brackets level with the end brackets.
|
Center Support Bracket
|
Snap the valance clips over the front lip of the head rail before
mounting the blind to the installation brackets. A valance clip is furnished
for every ladder. Install the valance clip next to each ladder. If the clips
are mounted directly in line with the ladders, they may catch on the cords
inside the head rail.
|
|
|
 |
-
1/2'' Aluminum
-
1'' Aluminum
-
2'' Aluminum
-
1'' Premium Wood
|
 |
 |
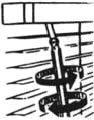
| Insert the head rail into the end brackets. If an auxiliary
support bracket is used, be sure that it is properly engaged with head rail. |
 |
Close the swivel covers to lock the head rail in place.
In the case of 2" blind brackets, it is important to make sure the swivel end
is engaged on the lip on bottom of bracket. |
 |
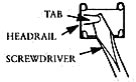
| If your blind is not fitting snugly left to right, open the
mounting brackets and remove the head rail and pry out the tab(s) at the ends
of the head rail a bit with a screw driver. If your blind fits too tightly,
press the tab(s) in with a pair of pliers. Now reinstall the head rail and
close the mounting bracket covers. This option only applies on some headrails. |
 |
Optional Projection Brackets
If you ordered the optional projection brackets, mount them to the wall or
window using two screws. Attach the installation and center brackets using two
machine screws and nuts per bracket. |
 |
| Step 3. Valance Installation |
|
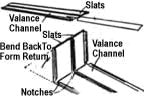
Deluxe Valances With Valance Channel. (optional)
On outside mount blinds, the valance channel is notched or pre-formed on the
backside to allow the ends of the channel to be formed into returns. Bend ends
back to form returns. |
 |
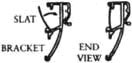
| Starting at one end, place the upper lip of the valance into the
top groove of the valance bracket. Carefully snap the lower lip into the bottom
groove on the bracket. Repeat this at each bracket. Valance return length may
be trimmed with scissors if necessary. |
Top Groove
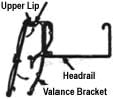 |
Bottom Groove |
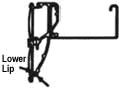
Standard Valances without Valance Channel
Place the lower edge of the slat into the center groove in the valance bracket.
Now carefully snap the upper edge of the slat into the top groove in the
bracket. Repeat this at each bracket across the blind. The lower valance slat
is installed in the same manner by placing its lower edge into the lower groove
in the valance bracket and carefully snapping the upper edge into the center
groove of the bracket. The slats may be trimmed with scissors if necessary. |
| Upper Valance Slat Installation |
 |
 |
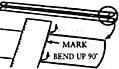
| To bend returns, place the slats on a table with the concave
(back) side up. Measure and mark the return size on each end of the slat. Place
a ruler (or other straight edge) on the mark and hold it firmly in place with
one hand. Place the other hand under the slat and bend it straight up. Install
the valance as previously described. |
Bending Valance Returns
 |
| Step 4. Hold Down Brackets |
|
| Note: Not recommended for single control
blinds. Recommended for OB mount blinds (i.e.: door installation) |
| Holds down brackets are used to keep the bottom of the blind from
swaying and were supplied if requested when ordering the blind. Some blinds
have bottom rail end caps with a hole in the center; on these blinds, push a
hold down pin into the hole in the end caps. |
-
Lower blind completely. Be sure bottom rail is level.
-
Place hold down brackets on bottom rail hold down pins(slotted bracket on the
right, slot down).
-
Mark bracket location on window frame.
-
Remove brackets and raise blind.
-
Drill holes for bracket screws and mount brackets.
-
To secure bottom rail, insert hold down pin into un slotted bracket first.
-
Then snap opposite pin into slotted bracket.
|
 |
| Step 5. Operating A Blind With Two Controls |
|
-
TILT:
Turn wand or pull string to tilt slats to desired angle.
-
RAISE OR LOWER:
Slats should be fully open, not tilted, when raising or lowering. To raise
blind, pull lift cord straight down. To lower blind, pull cord toward center of
blind and slowly raise your hand while holding onto the cord.
-
LOCK:
When cord hangs straight down, the cord lock holds the blind in position.
-
CAUTION: When blind is raised, keep lift cords away from door openings
to prevent tripping hazard.
|
 |
 |
| Step 6. Child Safety |
|
-
Clamp or Clothes Pins
-
Cleat
-
Tie the cord to itself
-
Tie-down device
|
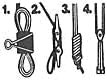 |

Young children can become entangled and strangle in cords. Keep
all cords out of the reach of children. To avoid strangulation, use these
devices. |
 |
|
|
| Step 7. Cleaning and Care |
|
| We recommend routine dusting with a soft brush, cloth or clean them with a
vacuum cleaner's brush attachment. If blinds become soiled, they may be cleaned
with a soft cloth dampened with warm water. You may want to add a small amount
of mild, non-abrasive liquid soap (I e. Dove, Ivory, etc.) to warm water. It is
also possible to have your blind professionally cleaned. We advise you to
utilize professional window treatment cleaning services if you elect to have
your blinds cleaned by methods other than those suggested above. Our warranty
does not cover damages caused by cleaning services. |
|
|
|