| Natural Wood Shades |
|
| How to Install Natural Wood Shades |
|
| Congratulations on your purchase of a natural wood shades.
Your shade has been custom made to your specifications and is one of the finest
window treatments available. Before you un wrap your shades, please take a few
moments to read these instructions. When using tools, make sure you have proper
eye protection. With careful installation and periodic cleaning, your blinds
will provide you with many years of trouble free service. Unpack your new shade
and check the packaging carefully to assure all parts have been removed before
discarding the shipping containers. |
|
| Tools Needed |
-
Tape Measure (metal or wood)
-
Pencil
-
Screwdrivers (flat)
-
Hammer and Finishing nails
-
Drill and 1/4" Hex head bit
-
Level (optional)
-
Scissors
-
1/16" and 7/64" Drill bits
|
|
| All parts listed are not included with every shade |
-
Head rail
-
Valance
-
Shade
-
Pull Cord
-
Tassels 2 Corded Shade
|
|
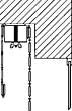
| Fastening the anchors into various materials: |
| Anchors (not supplied) |
| Plastic or lead anchor insert. |
| Plastic anchor insert for lightweight blinds only, in drywall, paneling, etc. |
| Hollow Wall Anchors (not supplied) |
| Hollow wall anchor for heavy blinds. |
| Hollow wall toggle bolt for heavy blinds. |
|

 |
|
 |
|
|
| Step 1. Determining Mounting Method |
|
| Your natural wood shade is custom made using the finest
materials available. Each shade includes all necessary installation hardware
and has been checked for operation and alignment. The following instructions
are for the three most common installation types. |
|
Inside Mount
 |
Outside Mount
 |
|
|
| Step 2. Attach Brackets to Mounting Surface |
|
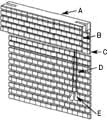
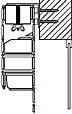
| Inside Mount |
| Inside Hang (ceiling mounted) - Shade is measured and assembled to fit inside
window casement with mounting bracket that is installed to top of casing with
screws placed at opposite corners. The wing nuts are removed. The screws slide
through the slots on the head rail and are secured by a wing nut. |
|
 |
|
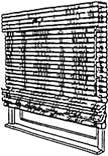
| Ceiling Mount |
| Outside Hang (ceiling mounted) - Shade is measured and assembled to overlap the
window casing. The mounting brackets are then installed to the ceiling by means
of screws or toggle bolts placed at opposite corners. Remove wing nuts. The
screws slide through the head rail slots and are secured with wing nuts. |
|
 |
|
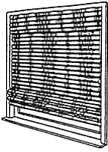
| Outside Mount |
| Outside Hang (wall mounted) - Shade is measured and assembled to overlap the
window casing. The mounting brackets are then installed to the wall by means of
screws or toggle bolts placed at opposite corners. Remove wing nuts. The screws
slide through the head rail slots and are secured with wing nuts. |
|
 |
|
|
| Step 3. Natural Shade Operation & Adjustment |
|
| Yarn and wood used on these fabrics have been specially
selected. The wood slats retain the grain texture and irregularities inherent
in natural wood of this type. The selection of pattern and yarns combines this
natural wood with the most contemporary colors for a truly unique window
fabric. |
|
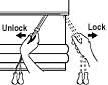
| Shade Operation |
| Both Roman & Roll-Up shades has the same basic hardware and operating
procedure. Cords, whether installed on the left or right side have the same
locking mechanisms. To raise the shade merely pull on the cord and release the
cord when the shade is at the desired height. To lower the shade, pull the cord
to the center of the shade with a slight tug. Then keep tension on the cord at
that angle and slowly let the cord go up, thus lowering the shade. If the shade
should bind, check the cord alignment over the pulley (under valance). |
|
 |
|
| Shade Adjustment & Alignment |
| Your shade has been carefully inspected and adjusted by the factory, but minor
adjustments may be necessary once it has been installed. The yarns in your
woven shades are flexible enough to permit minor adjustment horizontally and
vertically for proper alignment on your window. If the bottom of your shade
becomes uneven, merely pull down on either side to stretch the yard and align
the shade, But Be Careful. Pull Lightly! |
|
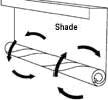
| If your shade doesn't lie flat against the wall or window, roll the shade
tightly from the bottom and twist roll clockwise on one side, counter clockwise
on the other, and this will align yarns and slats. Should a strand of yarn slip
off the edge of the shade, remove the strand from the top to bottom - this will
in no way affect the strength of the shade. |
|
 |
|
|
| Step 4. Child Safety |
|
-
Clamp or Clothes Pins
-
Cleat
-
Tie the cord to itself
-
Tie-down device
|
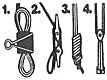 |

Young children can become entangled and strangle in cords. Keep
all cords out of the reach of children. To avoid strangulation, use these
devices. |
 |
|
|
| Step 5. Cleaning and Care |
|
| Periodic vacuuming with a brush attachment is all that is normally needed to
insure lasting beauty. It is recommended woven woods be treated with stain
repellent to minimize cleaning. With proper care and maintenance, natural woods
should last for years. |
|