| Cellular And Pleated Shades |
|
| How to Install Cellular and Pleated Shades |
|
| Congratulations on your purchase of cellular or pleated
shades. Your shade has been custom made to your specifications and is one of
the finest window treatments available. Before you un wrap your shades, please
take a few moments to read these instructions. When using tools, make sure you
have proper eye protection. With careful installation and periodic cleaning,
your blinds will provide you with many years of trouble free service. Unpack
your new shade and check the packaging carefully to assure all parts have been
removed before discarding the shipping containers. |
|
| Tools Needed |
-
Tape Measure (metal or wood)
-
Pencil
-
Screwdrivers (flat & Phillip)
-
1/4'' Hex nut driver
-
Drill
-
Level (optional)
-
1/16'' or 3/32'' drill bit
|
|
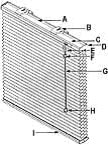
| All parts listed are not included with every shade |
-
Head rail
-
Installation Bracket
-
Cord Lock
-
End Cap
-
Stop Ball
-
Cord Joiner
-
Pull Cord
-
Tassel
-
Bottom Rail
|
|
| Fastening the brackets into various materials: |
| Sheetrock, Drywall or plaster |
| Plastic anchors or toggle bolts are required when studs cannot be used. |
|
 |
| Concrete, Stone, Brick or Tile |
| Use a carbide drill bit and appropriate expansion anchors. |
| Steel |
| Purchase #8 self-tapping screws. Drill pilot holes as necessary. |
|
 |
|
 |
|
|
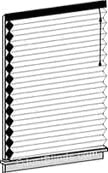
| Step 1. Determining Mounting Method |
|
| Your shade has been custom manufactured to your specifications as either an
Inside Mount (inside the window recess) or Outside Mount (on window frame or
wall) |
|
-
Inside Mount A minimum of 3/4" window recess is required
-
Outside Mount if mounting above trim or other obstructions (crank handles,
etc.) Spacers’ blocks may be required.
|
Inside Mount
 |
Outside Mount
 |
|
|
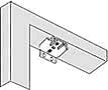
| Step 2. Attach Bracksts to Mounting Surface |
|
| Inside Mount |
| Mount the brackets to the top of the window frame and 2 1/2" in from the edge
of the window frame. Make sure the brackets are aligned with one another. |
|
 |
|
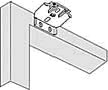
| Outside Mount |
| Center the shade over the window opening at the desired height. Mark the
position of the ends of the head rail on the wall. Attach the mounting brackets
to the wall 2 1/2" in from the marks making sure the mounting brackets are
level with one another. |
|
 |
|
|
| Step 3. Inserting the Head Rail |
|
| Inside Mount |
| Firmly push the back of the head rail into the tab of each bracket. Push up on
the bottom rear portion of the head rail to engage the hook at the bracket
front. |
|
 |
|
| Outside Mount |
| Engage the hook on the bracket front with the ridge on the top surface of the
head rail. Push up on the bottom rear portion of the head rail until the head
rail snaps into place. |
|
 |
|
|
| Step 4. Attaching the Optional Hold Down Brackets |
|
| Hold down brackets are used on the ends of the bottom rail to keep the blind
from swaying. They are used on applications such as doors or on frequently
opened windows to prevent the wind from blowing the shade around. They are
available at no extra charge but must be requested at the time of order
placement. |
|
 |
|
|
| CAUTION: Check to be sure that the
bracket and head rail are properly secured before operating the shade.
|
|
| Step 5. Operating Your Shade |
|
| To lower the shade, pull the cord down and toward the center of the shade to
unlock the cord. While holding the cord toward the center, lower the shade to
the desired position. Move the cord back past the outside edge of the shade and
release to lock the shade into position. |
|
 |
|
|
| Step 6. Child Safety |
|
-
Clamp or Clothes Pins
-
Cleat
-
Tie the cord to itself
-
Tie-down device
|
 |

Young children can become entangled and strangle in cords. Keep all cords out
of the reach of children. To avoid strangulation, use these devices. |
 |
|
|
| Step 7. Cleaning and Care |
|
| All you need to keep these shades looking new is a brush-type vacuum attachment or feather-duster for dusting; just stroke lightly over the shade. To clean with water, use a lukewarm damp sponge and wipe with firm, light strokes. |
|
| Note: With time, pleats may settle. Pleats at the bottom will be fuller than those at the top. Shades that are raised regularly will be less subject to pleat settling and will maintain a more crisp appearance. |
|